
I've always held a fascination for maps; from my first days exploring the GeoDjango project, to writing clustering systems and map renderers, to my experiments in indoor 3D mapping.
My 3D printer is a SeeMeCNC Rostock MAX v2. It's fantastic, and I had a lot of fun building it from the kit.
Thus, when I finally gave in and bought a 3D printer at the start of this year, I'd had a rough project in mind for a while - to 3D print maps with actual vertical relief. Initially, I had been looking at large-scale terrain - in the style of the old raised-relief poster maps - but then a story about the UK's ongoing Open Data initiative prompted me to log on to data.gov.uk and poke around a bit.
Browsing the geographic data revealed a set of LIDAR data collected by the Environment Agency; it didn't cover the whole country, or even the whole of London, but it did manage to cover a good size slice of central London along the river, including two of the places I've lived there.
Armed with a fresh objective to make a 3D map of my hometown, and hang it on my wall here in San Francisco, I downloaded the LIDAR data and started poking around.
LIDAR is rough
LIDAR has many uses beyond aerial mapping; I'd love to get my hands on indoor equipment for it, but it's pricey!
The first problem with LIDAR data is how dirty and unpredictable it is. The data is collected from a low-flying aircraft that samples point heights in a cone below it with a laser ranging system; this means the data you get back is essentially a grid of point heights every metre (or whatever resolution you've got; it varies in quality).
Now, a grid of point heights does not a 3D model make, and more importantly the heights aren't uniform. They jump around a bit as the natural error of laser ranging creeps in, so even a perfectly flat roof will come back as a bumpy mess of heights. That means you have two problems - turning the point cloud into something you can actually feed to a 3D printer, and refining the resulting model so it's not a jagged mess.
The first part - turning the point cloud into a 3D model - is relatively easy, provided you already know some 3D geometry; you just turn all the points into vertices, and then link them with a set of triangle strips to get a pure heightmap. 3D printers want an enclosed ("watertight") model, though, so you then have to make extra polygons down the sides and along the underneath of the heightmap to turn it into a solid tile.
I did this, and immediately ran into two problems:
A "slicer" is the program that takes a 3D model and turns it into instructions for the 3D printer to move the print head and extrude plastic.
The solution to both is to reduce the detail level of the output model, and use the detail you're throwing away to try and make nice smooth edges in what you end up with.
Now, someone with more time and better knowledge of feature extraction for mapping could likely take a much better approach to this, where they could recognise clumps of high points as buildings and just output a nice series of cuboids or other simple shapes to match.
I, however, don't really know what I'm doing and after trying to work out how to extract features nicely, just gave up and went for a brute-force approach. This means I just took all the data, averaged out points to make a lower-detail heightmap, snapped the heights to 3m intervals and applied neighbour-based smoothing to the whole thing.
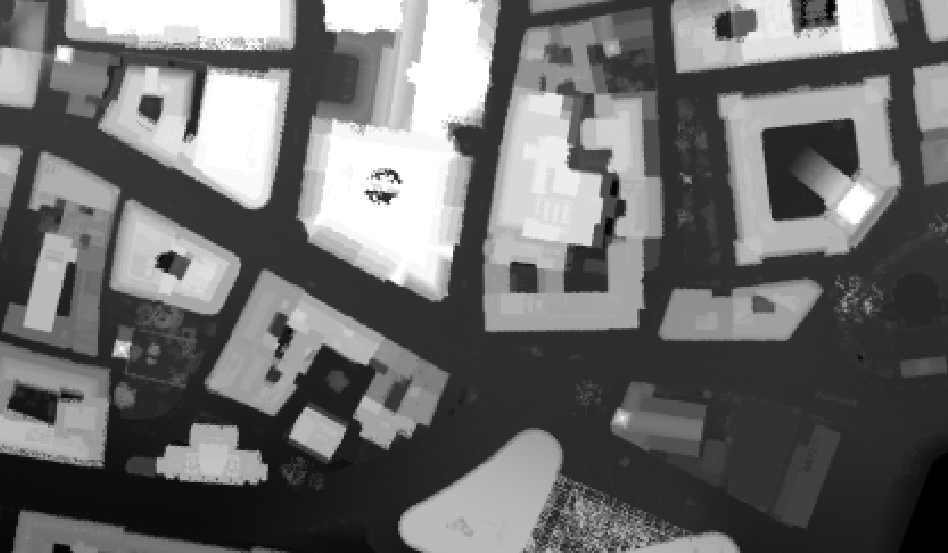
LIDAR data in QGIS
The converter I wrote also increases the height of the points by 50%, to better match people's perception of height.
The resulting output isn't perfect - drawing from something like the OpenStreetMap 3D building data would have been far cleaner - but it's very complete, capturing all the details of London, including railway viaducts, bridges, foliage in parks and even the Crossrail boreholes (which lead to some fun errors as my software couldn't cope with the ground height being negative).
STL is the defacto file format for 3D printing, and it's quite easy to read and write (which might not be unrelated).
The end result was 20MB STL files that my 3D printer slicing software would take a while to crunch on but always produce a printable result. You can find the software that does it as andrewgodwin/lidartile on GitHub - it's all Python, of course. It could likely run faster in another language, but it runs fast enough.
Refining the printing
If you're thinking of 3D printing without having tried it, you'd probably expect that we've got to the point where you shove some plastic into a printer and hit start. Unfortunately, it's not quite that easy yet; it's a lot better than it was, but you still have a lot of things to control.
ABS is the stuff that Lego is made out of; PLA is more brittle and generally feels cheaper, but biodegrades better and isn't oil based.
One main thing is the choice of plastic. My Rostock MAX v2 printer, at least in its default state, can print in one of two main 3D printing materials; ABS or PLA. The pros and cons of each are debated endlessly elsewhere, but what concerned me specifically was the ability to print fine detail.

Closeup of a single tile
A 3D printer like mine builds the object layer by layer, jumping between different buildings as it goes around each layer. If your material isn't right, your nozzle is too hot, the flow rate is too high, or any number of other factors, this will lead to the nozzle trailing plastic across the gaps between buildings, turning your beautiful model into a stringy mess.
It's not usually too much of a problem for most things you print; I always get a little bit, but it sands off easily. For something of this detail, though, it would be impossible to sand down every millimetre-wide street.
It took days of experimenting with different settings, materials and temperatures, and holding tiny landscapes up to judge them for quality, before I eventually got my 3D printer to jump across gaps with minimal oozing and stringing and still produce pretty fine detail. I also settled on PLA, as it's both easier to print (ABS loves to not stick to the printer and ruin a print halfway through) and it seemed to ooze less overall.
Getting it done
The Environment Agency grid is just 1km squares based on the OSGB36 projection, for all you mapping people out there.
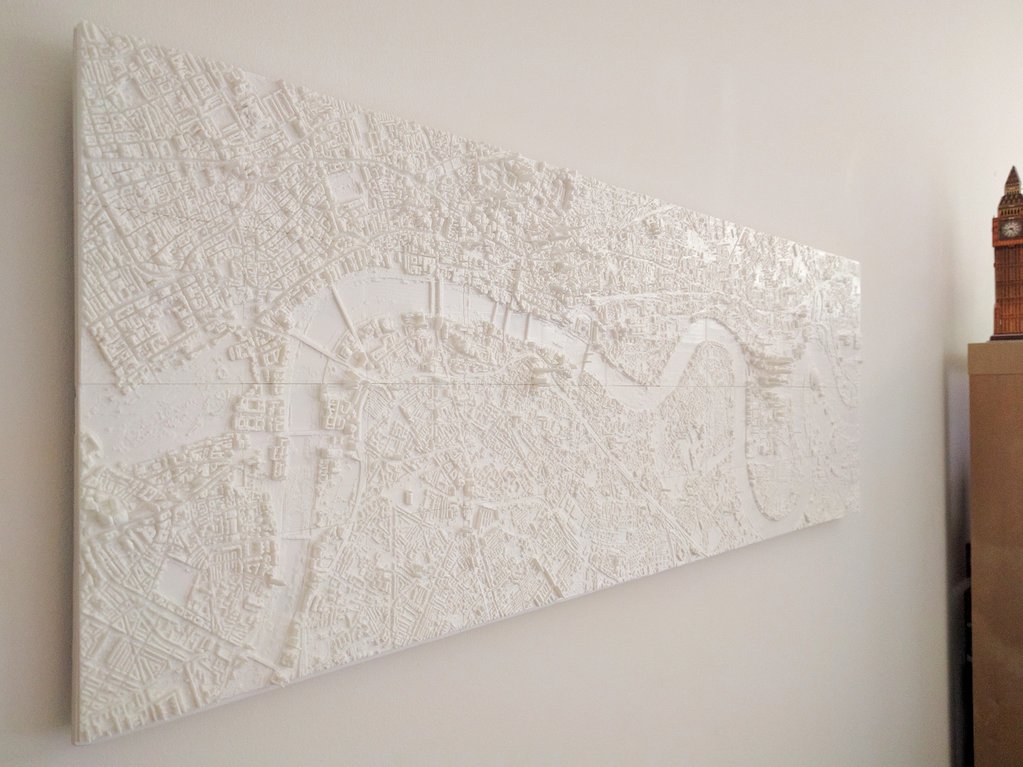
The section of London I had chosen that had good LIDAR data stretches from Hyde Park in the west to my old flat in the Royal Docks in the east, along the river Thames. With the way the Environment Agency had gridded up the LIDAR datasets, this meant 48 tiles; I chose to print them at a size of 7.5cm on each side, for a final size of 90cm long by 30cm high.
(It's possible to load the data into a program like QGIS and re-grid it to a different size or angle so you get different files to feed to my STL generator; I was just lucky that the grid the files came in suited my purposes well)
The reason for the small size is mainly printing time; to print a 7.5cm tile took between 1 and 4 hours, depending on the level of detail. To print a 15cm tile took between 3 and 12, which is bad for two reasons - it limits the times you can print things, as the printer should really have someone around while it's printing, and it means any print failure undoes a lot more work.
3D printers do not actually print everything solid; they have a configurable infill setting of how hollow to make solid objects. I ran with 30% infill.
As I discuss later, I would probably have been better off with the bigger tiles at the end of the day, but the iterative way I approached things meant I ended up going for the small ones, printed in the evenings or weekends when I was at home.
Over a period of several weeks, I got all 48 printed to a good level of detail, throwing away over 20 tile prints that came out with too much stringing or other problems. I now had the whole tile set; I just needed to get it on the wall.

Building out the full set
I've not really mounted anything so it could be hung before, and so my approach was basically to remember random things I'd heard said on the internet and Tested videos I'd watched to try and build something half-decent.
In the end, I chose to mount the tiles on a piece of foam board to hold them together, and then added three wooden spars across the back to provide stiffness, all secured with hot glue. The spars have screw eyes in them so it can be hung on the wall with string, like any old picture frame.
The main problem I encountered when prepping all the tiles for mounting was getting them all aligned; this is where I realised I should have gone for the larger tiles, as it would have meant four times less complexity, and less gaps.
3D printers take a lot of tuning to get them exactly accurate, but then again you're asking for sub-millimetre precision out of them over a pretty large area!
In particular, it turns out that my printer was not printing the tiles perfectly square (a situation I'm still trying to diagnose), and so the tiles ended up in a very slight rhomboid shape, meaning it was impossible to mount them without gaps; the resulting model thus has a few visible gaps viewed straight on, though they vanish into the detail if you look at it from an angle.
It also helps if you put the spars on the back first, as I forgot to do; I had to gently rest the front on foam blocks positioned along the flat parts of London to glue the spars on the back. Always a learning process.
Future Plans
Now I've finally got it all done, I'm pretty pleased with the end result. It could definitely be improved upon, but it still looks nice on the wall and sits proudly above my desk to remind me of home.
If I had the money and workshop space, I suspect a CnC milling machine would be a far more effective way of making these tiles than a 3D printer; they could be scaled up to a much larger size, though they might have more trouble with thin, fine details.
(Update: Discussions on Twitter have pointed out that the tool clearance would be a major issue for a milling machine, so this is likely a bad idea compared to 3D printing)
The overall cost of materials for the project was minor - only around $20 of plastic, and another $20 for the foam board, wood and glue. Of course, the cost of a 3D printer is not negligable; given the current London Hackspace running cost for their 3D printer, it would have been about $180 of running costs. The cost of wear and tear on my ($1000) printer is less than that, but it's not zero.
I suspect my next project will be attempting maps at the same scale for San Francisco and Oxford, to complete a trio of maps for cities I've lived in. Those I'm only going to attempt once I've got the printer aligned to be perfectly square and flat, and do as big, 15cm tiles; hopefully, the knowledge gleaned from that process can feed into another London model at some point, maybe from a newer LIDAR dataset than the one I have.
In the meantime, I can stare up at my wall and gaze around familiar streets and landmarks; the docks in East London where I used to live, the vertical point of the Shard rising above all else, the huge open space of Hyde Park, and even the railway viaduct in Bermondsey I walked along whenever I went to archery on a Wednesday night.
You can represent so much on a 2D map, and I still have a great love for all the different styles and details you can find on them. For me, though, a 3D map offers a little bit extra - its own little bit of perspective.